

Flight Controller
A flight controller is one of the most important components in a FPV drone. It’s responsible for stabilizing the aircraft, ensuring precise flight manoeuvres, and providing data to the pilot. In this article, we’ll explain in detail what a flight controller is, how it works, and why it’s such a critical part of any drone. Whether you’re a beginner or a seasoned pilot, understanding the basics of flight controllers is crucial for getting the most out of your flying experience.
Flight Controller: What it is and How it Works
A flight controller, or “FC”, is like the brain of an FPV drone. It’s a circuit board equipped with sensors that detect the drone’s movements and user commands. With this information, the FC adjusts the speed of the motors to move the drone in the desired direction.
All flight controllers have basic sensors like gyroscopes (gyro) and accelerometers (acc), while others may include other sensors such as barometric pressure sensors (barometer) and compasses (magnetometer).
The FC can also serve as a hub for other drone peripherals like ESC, GPS, LED, servos, radio receiver FPV camera and VTX.
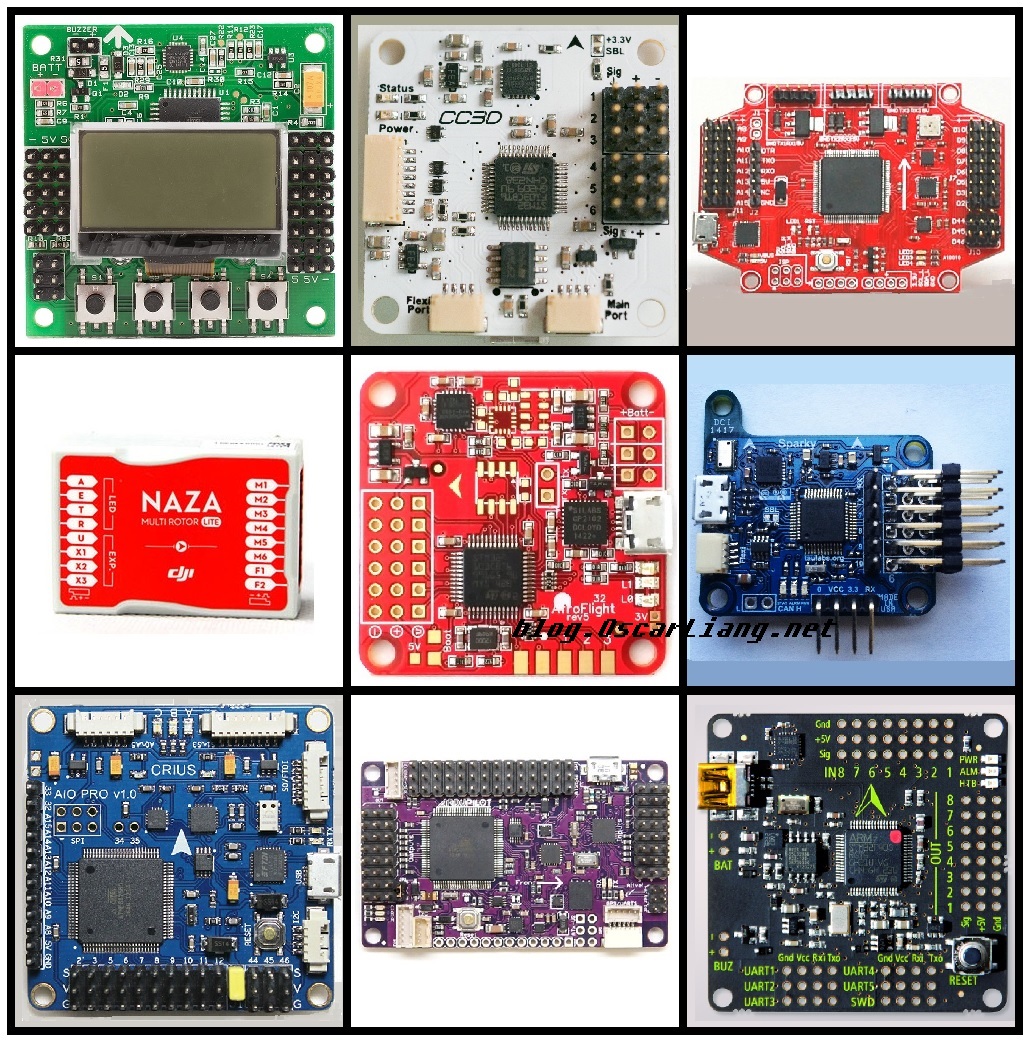
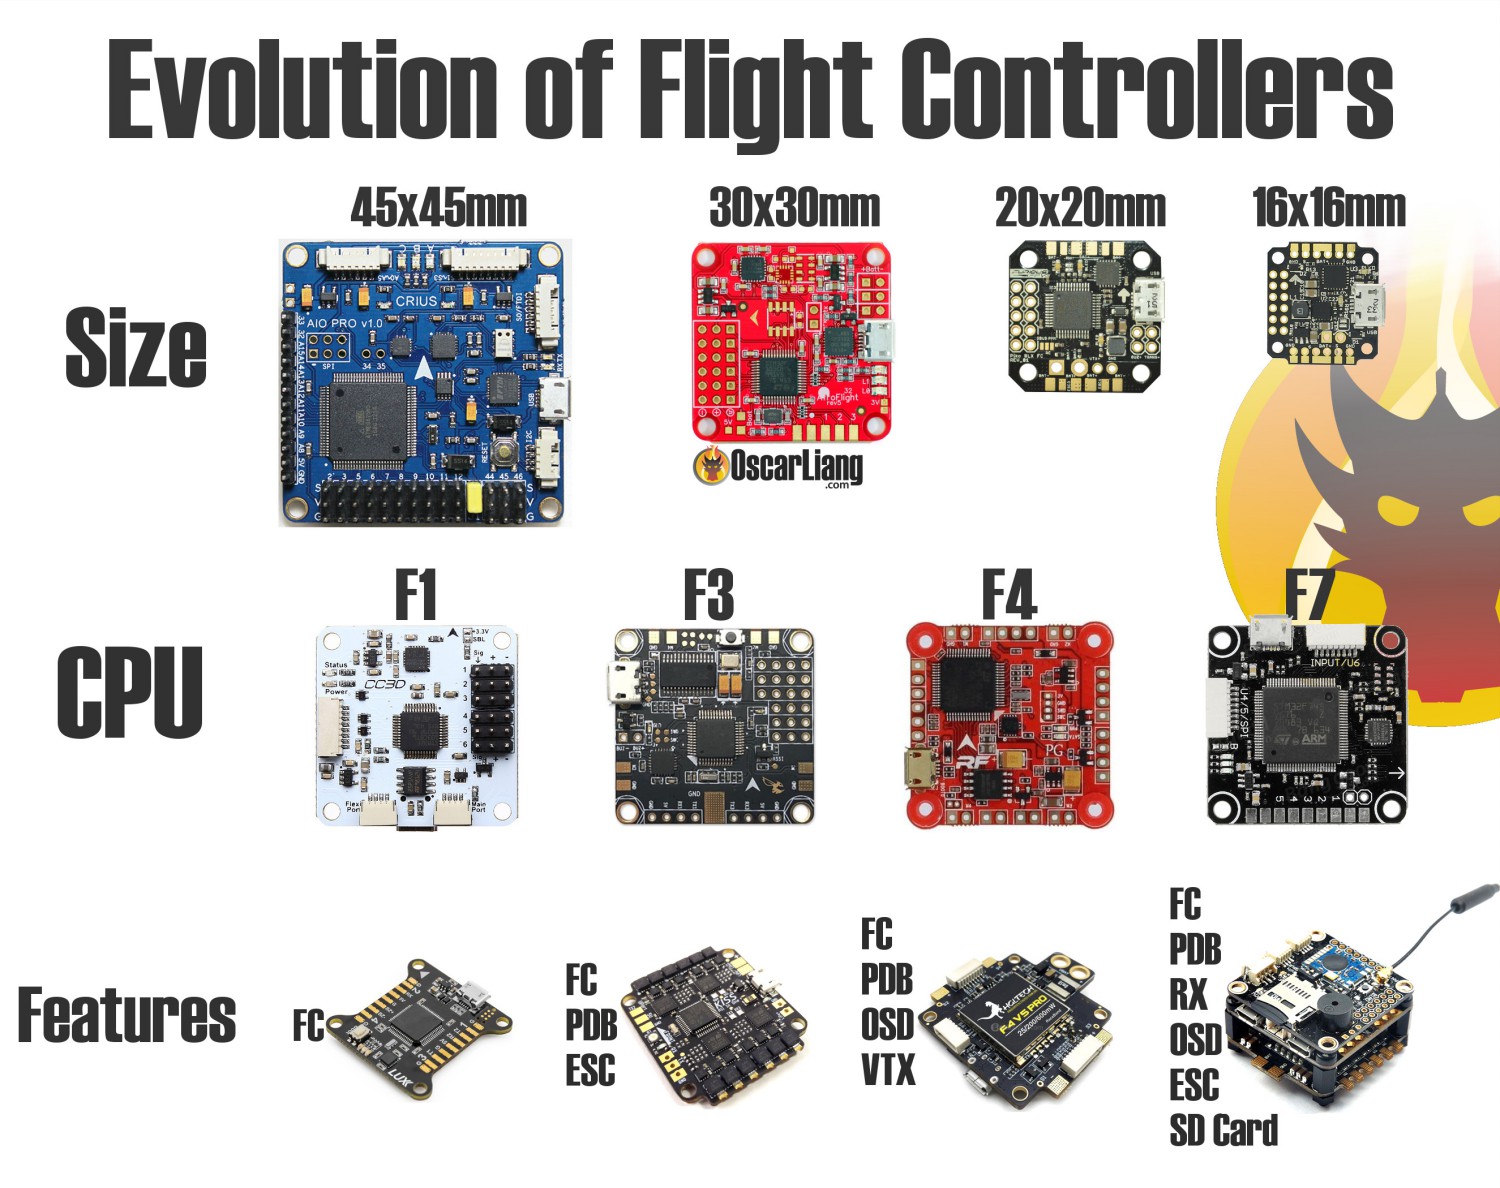
As technology advances, flight controllers are getting smaller, more feature-packed, and using better processors and hardware.
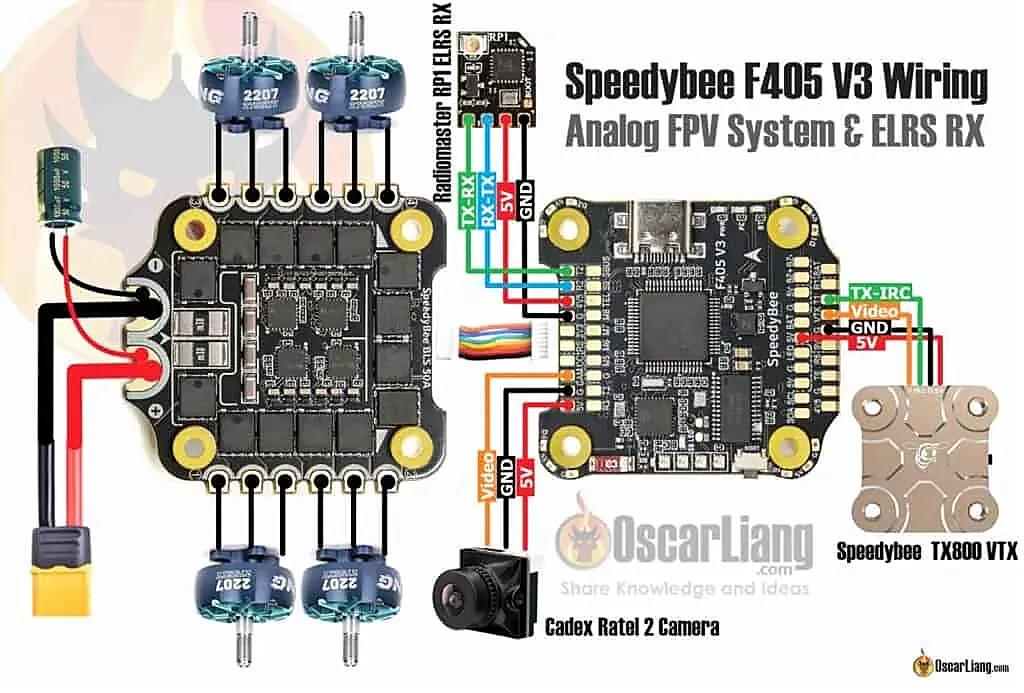
FC Connection
Here is an example wiring diagram how components in a FPV drone are connected to the flight controller.

Flight Controller Firmware
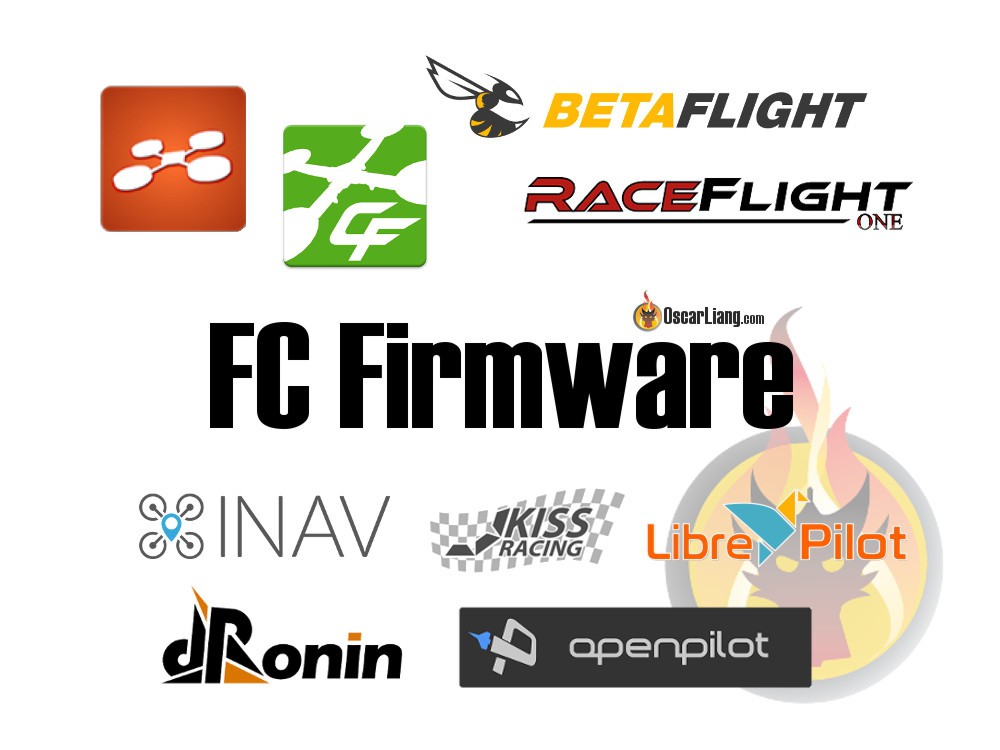
When it comes to flight controllers, you have a choice not only in hardware but also in firmware. Different firmware options offer different features and specializations for various applications. For example, iNav is designed with GPS utilization in mind, while Betaflight is more focused on flight performance.
Here are a list of popular FC firmware options for FPV drones:
- Betaflight: This open-source firmware has the biggest user base, making it easy to get help when you run into problems. It also has the widest range of flight controllers available.
- KISS: It’s a closed-source firmware, with the hardware and firmware controlled by a private company. This means you are limited to using their own flight controllers.
- iNav: If you are more interested in automated flying and GPS waypoint mission, iNav is the way to go.
If you are new to FPV, I’d recommend Betaflight as it’s one of the most versatile and popular firmware.
Once you’ve chosen your firmware, you can then look for a compatible flight controller board.
Configuration and Tuning

Flight controller firmware can be configured using a computer, smartphone, or radio controller. Each firmware has its own user interface (UI) and parameters that can be changed. However, even similar-looking UIs can produce different flight characteristics depending on the firmware, so it takes time to learn and adjust to a new one.
“Tuning” is the term we use in the hobby to describe the process of adjusting settings like PID, RC rates, and others to achieve desired flight characteristics. This is an important step in optimizing your FPV drone’s performance and getting the most out of your flight controller.
Processor

FC Processors: from left to right: STM32 F1, F3, F4
A flight controller uses microcontroller units (MCUs) to store firmware codes and perform complex calculations.
There are a few types of MCUs used for FCs, including F1, F3, F4, F7, and H7. The main differences between them are the calculation speed and memory size.
Update: F1 and F3 are no longer used in Betaflight FC due to the lack of memory.
| F1 | F3 | F4 | F7 | H7 | |
| Speed | 72MHz | 72MHz | 168MHz | 216MHz | 480MHz |
| Memory | 128KB | 256KB | 512KB-1MB | 512KB-1MB | 2MB |
F4, F7 and H7 are the all great processors while F1 and F3 are no longer supported in the latest versions of Betaflight due to insufficient storage for the expanding firmware.
What is UART in Flight Controller?
UART, or Universal Asynchronous Receiver/Transmitter, is a hardware serial interface that allows external devices to be connected to the flight controller. Examples include serial radio receivers, telemetry, race transponders, and VTX control.
Each UART has two pins, one for transmitting data (TX) and one for receiving data (RX). It’s important to remember that the TX on the peripheral device connects to the RX on the FC, and vice versa.
In the below example, UART3 (R3 and T3 pins) and UART6 (R6 and T6 pins) on a flight controller can be assigned to different tasks in the ports tab of Betaflight configurator.

Understanding UART and its pins is crucial in setting up your FPV drone for various applications.
Flight controllers might have different number of UART’s, make sure you check if they have enough for your build before purchasing.
If you need more UART ports, Betaflight has a feature called SoftSerial that allows you to create up to two additional UART ports through software. Keep in mind that SoftSerial increase the CPU load, it’s not suitable for slower processors, and you might have to lower PID Loop Frequency. Also softserial has a much lower update rate, which means it’s not suitable for time critical applications such as receiver signal and GPS.
UART Inversion
You only need to worry about UART inversion if you use Frsky receivers, because their output signals are inverted.
F3, F7 and H7 can handle inverted signals without any extra hardware, however, F1 and F4 require an external inverter to properly read the signal. To work around this, some F4 flight controllers have dedicated pads for SBUS connections (labelled SBUS). Alternatively, you can get the uninverted signal from the RX.
Gyroscope
The job of an IMU sensor is to measure the quadcopter’s movement and orientation. An IMU sensor contains both an accelerometer (ACC) and a gyroscope (Gyro).
The Flight Controller (FC) on a drone uses a range of sensors to detect movement and orientation. The main sensor used for this purpose is called an Inertial Measurement Unit (IMU). An IMU contains both an accelerometer and a gyroscope.
The gyro is used to measure angular velocity while the accelerometer measures linear acceleration. The most popular flight mode in Betaflight, Acro Mode, only uses the Gyro, while many other flight modes such as Angle Mode, Horizon Mode and Rescue mode all requires both the Gyro and Accelerometer to work.
IMU types overview
The most popular types of gyro for FPV drone FCs are made by two manufacturers: InvenSense (now part of TDK) and Bosch Sensortec. Here’s a list of common gyro models, along with the communication protocols they support and their maximum effective sampling frequency:
| IMU | Possible Communication Protocol (BUS) | Max. Effective Gyro Sampling Frequency |
| MPU6000 | SPI, i2c | 8KHz |
| MPU6050 | i2c | 4KHz |
| MPU6500 | SPI, i2c | 32KHz |
| MPU9150* | i2c | 4KHz |
| MPU9250* | SPI, i2c | 32KHz |
| ICM20602 | SPI, i2c | 32KHz |
| ICM20608 | SPI, i2c | 32KHz |
| ICM20689 | SPI, i2c | 32KHz |
| BMI270 | SPI, i2c | 6.4KHz |
* MPU9150 is effectively MPU6050 with an integrated AK8975 magnetometer, while MPU9250 is MPU6500 with the same magnetometer
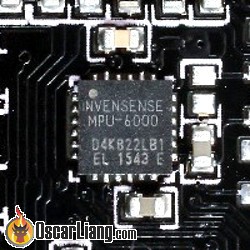
To find out which gyro your FC has you can find the IMU model number printed on the chip, for example this is the popular Invensense MPU-6000.
Gyro and Accelerometer on a flight controller
Or you can enter the “status” command in the Betaflight Configurator CLI and look for the name of the IMU under Gyro/ACC. Some FC may have more than one Gyro onboard, and you can choose which one to use in the CLI with the command “set gyro_to_use=0 or 1”.

How to choose Gyro
The choice of gyro depends on its max sampling rate and susceptibility to electrical and mechanical noise.
Before 2022, the most widely used gyro was MPU6000 because of its robustness against noise.
The general consensus is to avoid MPU6500 and MPU9250 despite their higher sampling speed.
The ICM20689 is also a decent gyro in terms of performance but allegedly has a higher failure rate. The ICM20602 is another popular choice, however it’s more susceptible to noise and harder to tune. Since Betaflight 4.1 (Oct 2019), 32KHz gyro sampling rate has been removed from Betaflight, so there is no advantage using gyro with 32KHz sampling rate.
However, since 2022, more FC manufacturers have shifted towards BMI270 due to global silicon shortages. While its max sampling frequency is 6.4KHz, Betaflight forces it to go into OSR4 mode (with a cutoff frequency of 300Hz), resulting in an even lower sampling rate of 3.2KHz. That sounds suboptimal, but as I have tested it myself personally, the actual performance of BMI270 is comparable to MPU6000 (in Betaflight 4.3/4.4). The main downside is probably the extra filtering that is sometimes required as the cut-off frequency is higher in the built-in low pass filter with the BMI270 gyro.
There are FC with the Gyro “soft mounted” on a piece of foam for reducing vibrations getting to the gyro. This is not a very popular approach, as it’s been proven unnecessary as long as the flight controller itself is adequately soft-mounted. Here are some tips on soft-mounting and filtering capacitors to reduce noise.

Soft mounted Gyro – Kakute F4
Gyro BUS
There are two types of communication between the gyro and processor: SPI and i2c.
SPI is the preferred communication protocol between the IMU and processor because it allows for a much higher gyro refresh rate than I2C (which has a limit of 4KHz). Almost all modern FCs today use SPI connection for the gyro.
We want to avoid MPU6050 and 9150 because they only support i2c and not SPI.
Layout
FC layout refers to the arrangement of pins and solder pads on a flight controller board, which can greatly affect how easy it is to connect various components.
Many people only care about the capability of a flight controller, and can overlook the importance of the layout.
Despite its importance, many people tend to focus solely on the capabilities of the flight controller, overlooking the layout. For instance, the CLRacing F7 and Kakute F7 are both excellent flight controllers, but in my opinion, the CLRacing F7 has a superior layout with all the pads grouped by function and located all the edges.
Personal preferences may differ, but the layout is an essential consideration in selecting a flight controller.

CL Racing F7 FC

Kakute F7 FC
ESC Compatibility
4in1 ESC’s are often sold together with flight controllers nowadays as a stack, and they are designed to be plug and play.

However, for ESC and FC from different brands, the plugs and connections between these boards might be incompatible, so it’s important to double check before connecting or you could fry your FC.

If you wish to use single ESC (individual ESC mounted on the arms), I recommend using “AIO (all in one) FC”. These are FC with integrated PDB (power distribution board). But this is outdated, the latest trend is using 4in1 ESC. As a matter of act, it’s getting increasingly hard to find single ESC nowadays.

Mounting Pattern
The mounting pattern refers to the distance between the adjacent mounting holes on a flight controller. Common patterns include 30.5×30.5mm, 25.5×25.5mm, 20×20mm, and 16×16mm. The pattern is mostly determined by the size of the board and the aircraft it’s intended for. For drones larger than 5″, 30.5×30.5mm is often used, while smaller drones generally use25.5×25.5mm and 20×20mm. The 16×16mm pattern is becoming popular for micro builds under 100mm.

Other Features
Flight controllers come with a range of features that can enhance your flying experience. Let’s take a look at some of them.
Blackbox
Blackbox is useful for tuning and troubleshooting. You can record your flight data in two ways – using integrated flash memory or storing it on an SD card if there’s an onboard SD card logger.
Flash memory is cheaper but has limited storage capacity, typically 5 to 10 minutes of flight data. Downloading data from it can also be slow. Using an SD card reader on your flight controller, you can keep recording all year long without emptying the storage, and it gives you access to the logs instantly by inserting the SD card in a card reader.
Blackbox logs is a must-have for experienced pilots. It gives you the ability to squeeze every bit of performance out of the drone and diagnose issues in detail. If your flight controller doesn’t have an SD card slot or flash memory, you can also connect an external SD card reader to the FC via UART.
Connector Types

The three main types of connectors on a flight controller are
- Plastic JST connectors
- Solder pads
- Through holes
Plastic connectors are less durable but convenient to use, while solder pads are more robust but requires soldering. Through holes give you the option of direct soldering or using header pins.
- Pro Tip: How to remove header pins on a FC.
- Pro Tip: With solder pads, did you know that it’s possible to fix them if they peel off?
BEC
BEC (battery eliminator circuit) is just what we call voltage regulators on a flight controller.
Almost all flight controllers have a 5V BEC for powering radio receiver, GPS etc, while some also offer 9V or 12V BEC dedicated for powering the video transmitter. Although you can power FPV gear directly from the LiPo battery, powering them from a regulated power source can produce better results.
It’s important to choose the right voltage source based on the device you’re powering. Some devices can be powered directly from the LiPo battery e.g. the video transmitter. However the power source from LiPo tends to be noisy, voltage spikes can even damage your devices if there isn’t enough filtering. A BEC acts as a power filter and is usually a better power source, but you need to check if it meets the voltage and current requirements of your device.
Barometer
Having a barometer built into your flight controller can make GPS-assisted flight more accurate (such as GPS Rescue Mode), but it’s not mandatory.
OSD Chip
For analog FPV system, make sure your flight controller has an OSD chip (AT7456E) available, or Betaflight OSD won’t work. However, it’s not necessary for digital FPV systems such as DJI, HDZero and Avatar, all they need for OSD to work is just a spare UART .
A Little History
The history of FPV drone flight controller can be traced back to 2009, when a maker used the Wii Motion Plus Accessory with an Arduino board to control a drone. This led to the development of the Multiwii project, which eventually created its own flight controller board that worked on an 8-bit Atmel processor.
In 2013, another developer named “timecop” created a flight controller board with an ARM 32-bit processor, Naze32, and ported the Multiwii source code to it, called “Baseflight.” This board established the 35x35mm form factor (with 30x30mm mounting) and is still relevant till this day.
In 2014, “Hydra” modified Baseflight and created Cleanflight, leading to an explosion in the 32-bit flight controller market, with manufacturers developing their own FC variants.
Betaflight was created in 2015 by “BorisB”, using Cleanflight’s source code and making significant modifications to it. When Betaflight was first released, it was mainly focused on improving the performance of Cleanflight, while also adding new features and capabilities. Over time, Betaflight has diverged significantly from Cleanflight, and is now considered a separate and distinct firmware. Betaflight is currently the most popular flight controller firmware for FPV drones, and is still being frequent updated.
Mepsking FPV Forum, where you can learn everything about drone and flying skills. Check mepsking store if you want to buy drone parts.