


My son is always willing to help me in building or disassembling any kind of stuff, so he was very enthusiastic when I told him about the plan to build a quadcopter from scratch (OK, almost from scratch). His only complaint was why we didn’t build an octa-copter or at least a hexacopter. I promised him that if this F450 will really fly then we will get to build a more complex one, the Tarot 650PRO.
I was always interested in the “Do It Yourself” types of projects. I previously built some Arduino-based devices therefore building an Arducopter will not be something totally new for me. Just to brag, I also built my own audio system from the amplifier to the loudspeakers.
Building something from scratch takes a lot of research and patience. Especially for newbies is more convenient and safe to start with a quadcopter kit. But I have to say, that my next DIY quad will be probably from scratch. It’s also fun to choose the right parts, design the circuits, and build your own concept.
There are many quadcopter kits on the market, from affordable ones to more expensive professional ones. It is very difficult to choose the right one. Having some Arduino knowledge I was glad to receive a quadcopter kit built around the APM 2.8 flight controller.
F450 flame wheel with APM 2.8
Initially, I contacted XT-Xinte regarding a new main-board for my X380 Quad but finally, I ended up with an ARF F450 kit. BTW, ARF means “Almost Ready to Fly”. They offered this quadcopter kit for free in order to make a step-by-step guide about how to assemble it.
In the beginning, I was very optimistic, I was absolutely sure that the F450 with APM 2.8 is a well documented DIY quadcopter. Unfortunately, after several hours of internet research, I found only fractions of the building process. Like this would not be enough, the package doesn’t include any instruction about how to assemble the airframe or how to interconnect the flight controller with the RX module, ESCs, and motors. For those who are newbies on the DIY filed this issue can be very scary :).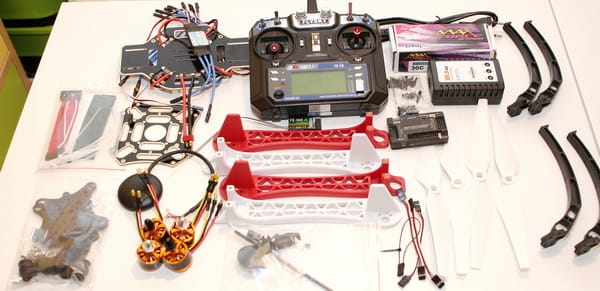
I received the package in 10 days, which is unusually fast for orders from China. All the parts bellow where precisely stuffed in a small cardboard box (25 x 25 x 25cm).
F450 DIY quadcopter kit – Parts list
- HJ450 nylon fiber frame kit aka F450 flamewheel airframe;
- 1 set of 140 mm high landing skids;
- APM2.8 flight controller with case;
- 6M GPS with Compass L5883;
- Flysky FS-i6 6 channel transmitter (TX);
- Flysky FS-i6A 6CH receiver (RX);
- 2 pieces of CW brushless motors, D2212 920KV – JMT F15844;
- 2 pieces of CCW brushless motors, D2212 920KV – JMT F15843;
- 1 set of 30A electronic speed controllers (ESC);
- 1 set of 9443 propellers (2CW and 2CCW);
- 5 pieces of 10cm F-F servo extension wires;
- DJI GPS foldable antenna mount;
- Carbon fiber GoPro camera mount with damping balls;
- Hook & loop fastener;
- IMAX RC B3 Pro compact 2s and 3s balance battery charger;
- 11.1V 2200MAH 30C Li-Po battery;
- 3 bags of screws.
Be aware that the package does not include any tools. For assembling you will probably need: a 2 mm hex wrench, small and medium Phillips screwdrivers, and a basic soldering iron.
Arducopter APM 2.8 flight controller
Over time, the APM flight controller received many hardware updates and the current version is 2.8.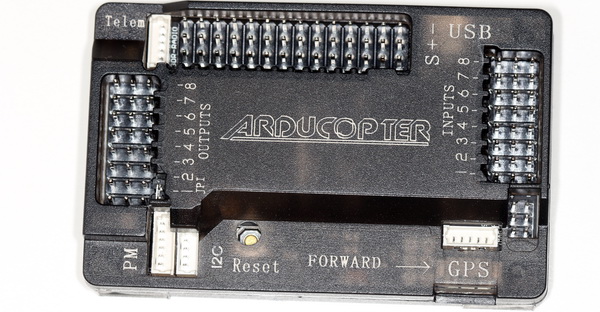
The APM 2.8 FC is based on the ATmega2560 CPU, which is a low power consumption 8-Bit microcontroller. A secondary ATMEGA32U2 AVR RISC-based microcontroller is used as PPM encoder. The flight controller also incorporates a 3 axis gyro\accelerometer sensor (MPU 6000) and a pressure sensor (MS5611).
Having 8 outputs, the Arducopter FC is suitable not just for quad-copters but also for Hexa and octa-copters.
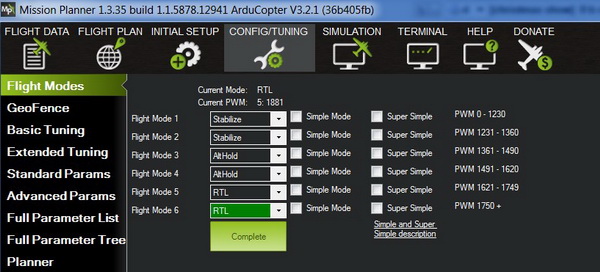
One of the biggest advantages of this platform is great software support through the MissionPlanner app.
By default, the flight controller is configured with 6 different flight modes (Stabilize, Loiter, AltHold, RTL, Circle, and Auto) which can all be flagged with “super simple” and “simple mode”.
The Ardcopter can be paired with much optional hardware like:
- Telemetry module for real-time monitoring of the flight parameters;
- Minim OSD for FPV flights;
- 3DR power module in order to monitor the battery voltage and current consumption;
- Optical flow sensor;
- Brushless and servo camera gimbals;
- Received Signal Strength Indication (RSSI);
- External status LEDs and Buzzer;
- Parachute;
- Retractable landing skids.
Flysky FS-i6A transmitter
The kit includes an entry-level 6 channel remote controller from FlySky, which in fact seems to be a copy of the Turnigy TGY-i6 transmitter. Frankly, I would have preferred a more complex one with more channels. The FC requires at least 5 channels (CH1-4: Roll, Pitch, Throttle, and Yaw; CH5: flight mode switch). Unfortunately, there is some interference between CH5 and CH6 so be careful during the flight modes assignment on the “SWC” switch. In order to control the tilt angle of my MiNi3D Pro brushless gimbal I assigned the CH6 to the “VRA” knob.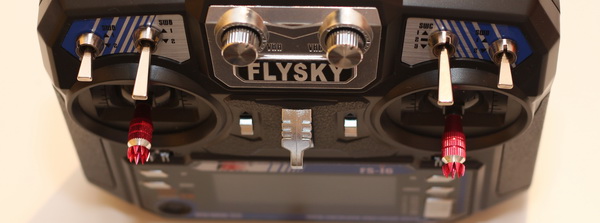
Assembling the F450 flame wheel airframe – Step 1
Before you start to assemble the frame, check and inspect again all the included parts. For example, the arms had some plastic residues from the production process which can prevent the correct installation of the motors. I recommend removing those residues from the motor base with a piece of sandpaper.
Basically, the F450 air-frame is formed out of 4 arms (2 red and 2 white) linked together by two boards (top – 450FBT and bottom 450 FBB). The bottom board also serves to electronically interconnect the battery with the ESCs.
In the first phase attach and secure each arm with two screws to the bottom board (red arm in the front part). Next, you can install the top board. For this, you will need 4 screws for each arm.
After you are done, I recommend labeling the arms from 1 to 4 exactly like in the image below (X shape quadcopter).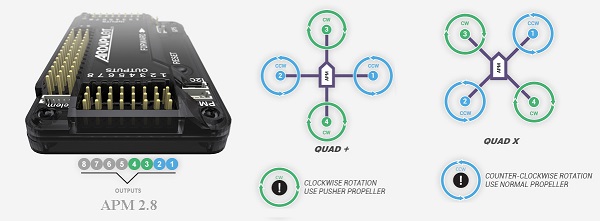
Installing and wiring the motors and ESCs – Step 2
As mine came with a battery connector and ESCs soldered to the power board, I had an easy job. Practically I had to install all the motors following the correct order (listed below) and interconnect them with the 30A ESCs (through the bullet connectors). The rotation direction of the motors can be simply reversed by switching two-wire connections from the existing three (between the ESCs and motors).
Motor/Propeller order and direction of rotation:
- Arm 1 (red) – CounterClockWise;
- Arm 2 (white) – CCW;
- Arm 3 (red) – ClockWise;
- Arm 4 (white) – CW;
Organize all the cables and make sure that the cables can not be cut accidentally by the propellers.
Mounting and wiring the Ardupilot APM 2.8 FC – Step 3
There are two different approaches regarding the location of the FC. It can be installed on the bottom board as well as on the top one. I opted for installing it on the top board for two reasons: I think this way the battery weight can be more easily distributed and I will have better access to the connection wires with the FC (in case I have to change something).
On top of the APM2.8 ArduPilot, there is an arrow showing the direction of its installation. Don’t miss this detail! In order to get the best results, I recommend the FC to be positioned so that the internal Gyro sensor (MPU6000) to be exactly in the center of the F450 airframe.
Each ESC servo cable should be connected to one of the output ports of the flight controller. If you listened to my previous instructions, you will find the correct order already labeled on the arms.
The next step is to interconnect the flight controller with the radio receiver using 5 servo cables.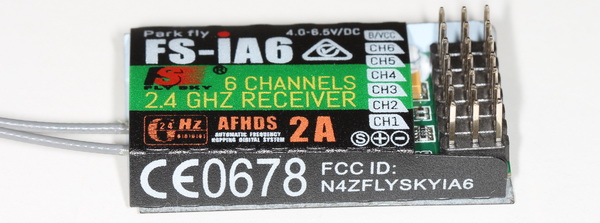
The last step is to install and connect the GPS antenna to the Arducopter FC. That’s it! You’re done with the basic wiring.
Before the first tests, I do not recommend to connect other devices (like telemetry or camera gimbal) to the flight controller.
Once again, make sure that there are no wires or other parts in the way of the propellers.
First time setup with Mission Planner – Step 4
Prior to interconnecting the FC with your computer using a micro-USB cable, you must install the MissionPlanner app. After you are connected you can select from the “Initial setup” menu the “Mandatory Hardware Configuration” option or you can run the “MP setup Wizard”. You should consider to check in MP the followings before your first flight:
- Frame type;
- Compass calibration;
- Transmitter calibration;
- Accelerometer calibration;
- RC Transmitter Mode Setup;
- ESC calibration;
- Default flight modes.
As safety measurement is mandatory to remove the propellers during any calibration process.
Testing the F450 quadcopter – Final step
Maybe I went a bit too deep into details and many of you could be bored by this tutorial so I will leave the testing part and my first flight experience with this DIY F450 quadcopter for a future article.
My first DIY Quadcopter – Final words
The final result probably doesn’t look as good as a branded quadcopter, but you will have similar flight performances as Cheerson CX20 Open Source has for only about $130.
The fact that the package doesn’t include any instruction regarding assembling should not bother you. It can be easily assembled in about 3-4 hours. Trust me, nothing can be compared with the feeling that you built something that really flies :). For those who are interested to build their own quadcopter. After acquiring a little experience in this field I can say that I will definitely build a second one, probably a hexa-quadcopter 🙂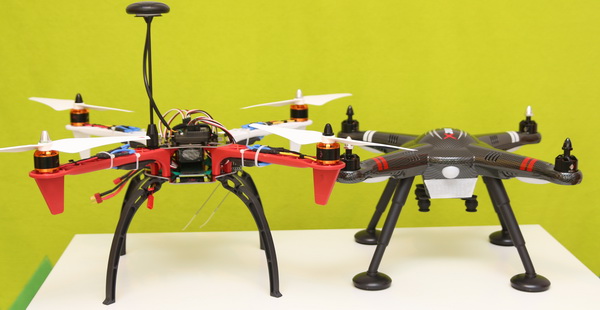
What I liked
- Building my own quadcopter can double the FUN!
- Extremely affordable GPS quadcopter;
- Highly upgradable quadcopter kit;
- Scalable platform (by replacing the air-frame and adding two extra motors and ESCs you can have a hexacopter).
What I didn’t like
- There is no documentation included with the quadcopter kit;
- Not perfectly aligned screw holes;
- Shaky landing skids;